How To Customize WooCommerce Checkout Page
A WooCommerce checkout page is a page that is interconnected to the debit and payment information on the WooCommerce website. This page enables customers to insert their payment information and finalize their purchases. Hence, a WooCommerce checkout page is the final crucial step in purchasing.
Thus, the process needs to be smooth, efficient, and convenient. The more streamlined the checkout process, the better the chances of a successful purchase. To enhance the efficiency and efficacy of your WooCommerce store, it is imperative to customize and optimize the checkout page. The checkout page should be optimized to make it easily accessible, understandable, and convenient. This will refine the customer’s experience and minimize the customer’s abandonment rate.
Why It Is Important to Customize the WooCommerce Checkout Page
Shoppers ditch approximately 69% of shopping carts. This reality depicts those clients who want to buy goods but decide not to when they are almost at the end of the process. This is a significant complication that many stores experience and makes it one of the main factors contributing to the need to customize your WooCommerce checkout page. Other notable factors include lack of trust from the customers, exorbitant shipping costs, forced account creation, and perception of insecurity. Resolving these particular complications can help decrease the cart abandonment rate, and this can be simply accomplished by optimizing the checkout page.
How To Customize WooCommerce Checkout Page
You can use two primary strategies to customize your WooCommerce checkout page effectively. They include customizing programmatically (coding) or customizing with a plugin. The former strategy is used by those who are adept in programming (coding), while the latter is used by those who are not well acquainted with programming. Let’s start by discussing how you can optimize the checkout page programmatically.
Customizing Programmatically by Coding

Get Rid of Irrelevant Fields
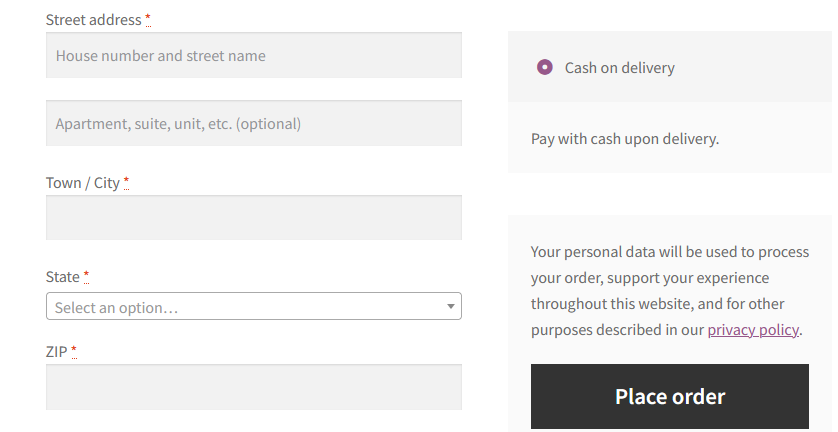
The general WooCommerce checkout page incorporates approximately 14.88 irrelevant fields. These additional and irrelevant fields are bound to confuse and discourage shoppers because the process of filling them is tiresome and time-consuming. Thus, most customers are bound not to complete the purchase process. This is why it is highly advisable to eliminate any irrelevant and/or repetitive fields. Per the Baymard Institute, a comprehensive checkout page only requires between 6 to 8 fields. However, the average WooCommerce checkout page has between 18 to 20 fields, many of which are repetitive and irrelevant. For instance, it is possible to get rid of “company name”, “street address”, and “postal address”, among many other unnecessary fields. This is example of PHP snippets:
add_filter('woocommerce_checkout_fields', 'custom_override_checkout_fields');
function custom_override_checkout_fields($fields)
 {
 unset($fields['billing']['billing_address_2']);
 return $fields;
 }
Remove Page Distractions
The paramount objective of the WooCommerce checkout page is to finalize the purchase process. Thus, it would be most convenient if any irrelevant information is not displayed on this page. This can cause a distraction that will frustrate the shoppers. For instance, clickable buttons can cause page distractions because shoppers can click on them and abandon the checkout page before finalizing the payment process. Furthermore, this page should not incorporate any particular advertisements that are likely to cause distractions. Therefore, to streamline the shoppers’ payment experience, ensure you remove any irrelevant ads and/or displays from the checkout page.
Make the Shoppers Feel Safe
You need to ensure that your customers feel safe while shopping. For example, research conducted by the Baymard Institute depicts that approximately 18% of shoppers are bound to leave their cart when they perceive it is insecure about sharing their credit card details. This is because the rate of credit card fraud increases annually. Thus, it would be best if you guaranteed the shoppers that their private information is safe and they will not fall victim to credit card fraud while shopping on your platform. To prevent such perceptions and to effectively modify the WooCommerce checkout page, it is recommended to display a detailed privacy policy, install SSL, and incorporate certified emblems on the page. This will significantly reduce the shoppers’ fear and make them feel safe while shopping on your platform.
Include Security and Trust Seals
Particular shoppers will strictly not complete a purchase from a WooCommerce checkout page that lacks security and trust seals. A checkout page that does not incorporate SSL encryption will also discourage shoppers. Per a study conducted by Blue Fountain Media, completed purchases increased by approximately 42% after the inclusion of notable trust seals. It is vital to ensure that you include trust seals from trusted and noteworthy companies, for example, Norton, McAfee, etcetera. checkout this How to protect your WordPress site from brute force attacks step by step
Include a Variety of Payment Alternatives
A study conducted by the Baymard Institute revealed that approximately 6% of shoppers leave their carts due to restrained payment alternatives. This is because a majority of customers are likely to complete the purchase process if they note there are convenient payment alternatives. For example, it is important to ensure that your WooCommerce checkout page incorporates numerous credit card alternatives like JCB, Amex, Visa, Discover, and Mastercard. Furthermore, it is good to incorporate PayPal as a payment alternative. This is because it is growing as an approved mode for online transactions.
Utilize Inline Error Validation
WooCommerce automatically displays all error notifications on the page, and this can easily frustrate the potential shopper. This is because the shopper will have to scrutinize every particular notification individually and gradually make the appropriate changes. To prevent such inconveniences, utilizing inline error validation on the WooCommerce checkout page is advisable. Inline error validation is effective because it simplifies the process by enabling the shoppers to easily correct any wrong information.
Add Order Bumps
The ultimate objective of including order bumps on the WooCommerce checkout page is to optimize every individual shopper’s Average Order Value (AOV). Order bumps should be exhibited when a shopper is close to ordering completion. Order bumps are distinguishable from upsells and cross-sell. It is imperative to note that order bumps can either be complementary goods or an add-on. However, the bump should not surpass the original selling price.
Customizing Using a Plugin
People who do not have good coding skills can customize their WooCommerce checkout page using a plugin. There are several noteworthy plugins to use that will help you customize the WooCommerce checkout page. A plugin is an effective way to customize the checkout page because it enables you to add, delete, and edit fields on the checkout page. Furthermore, a plugin is convenient because it is quite easy to use. You can incorporate billing, shipping, and other important fields to the page simply by navigating through the menu options. A plugin tool lets you display or hide particular fields from the checkout page. For example, the country, company name, email, address, first and last name, city, phone number, and zip code. Therefore, it is quite a useful tool for those who are not well acquainted with programming (coding).
Create a Custom Upload File Field
One of the noteworthy characteristics of using a plugin is the prospect of enabling customers to upload various files in the course of the purchase. This is quite useful for the customers because it enables them to easily acquire their services.
For example, suppose a shopper would like to reserve a hotel or rent a vehicle online. In that case, he/she will be able to upload his/her identification documents and/or driver’s license on the WooCommerce checkout page. Furthermore, the plugin enables you to edit the uploaded files and allow the user/s to supervise their files in the event they would like to upload additional files.
Add Fees to the Checkout
A plugin is good because it offers an option to add fees to the WooCommerce checkout page. This option is quite useful because it enables you to add charges in particular circumstances, such as special handling, fees associated with payment gateways or credit cards, express delivery, and extra charge for shipping to particular places. The plugin is good because it gives you enough control and flexibility to add or minimize fees. Hence, if you are not well acquainted with programming (coding), a plugin can help you effectively customize the checkout page.
Download plugin Add Custom Fee to WooCommerce
Create Conditional Fields
A plugin is a good tool because it will also help you to create conditional fields on your WooCommerce checkout page. This will, in turn, enhance your customers’ shopping experience and reduce cart abandonment. Additionally, the plugin enables you to easily create as many fields as possible, delete the irrelevant fields, and edit the fields effectively, thus providing the shoppers with an outstanding experience. Therefore, a plugin is an advisable strategy to use to customize the checkout page per your customers’ preferences.
you can use the plugin Checkout Field Editor (Checkout Manager) for WooCommerce to modify the checkout field.
Conclusion
The WooCommerce checkout page is quite an important page that enables customers and shop owners to conveniently conduct their transactions. However, if the checkout page is not well customized, it will frustrate customers and discourage them from shopping in WooCommerce again. Shop owners need to customize the checkout page in correlation with the customers’ preferences. This will help them retain their customers and attract new customers, thus making the firm thrive in the long run.

How to hook into Contact Form 7 Before Send

How to Change WooCommerce Checkout Fields Order
How to enable maintenance mode in WordPress
About Author
MD Hamidul Islam
Add a Comment
You must be logged in to post a comment.
2 Comments