How to create a landing page in wordpress
Want to develop a landing page with WordPress? Landing pages are an integral part of every successful marketing strategy, allowing you to attract more visitors to your site and convert them into paying customers. Creating a landing page in WordPress is a straightforward process that we’ll walk you through here.
What is a Landing Page?
A landing page is a page made specifically to increase sales or generate leads for an organization. They’re commonly integrated into paid advertising initiatives, as well as email and social media outreach. It is dubbed a “landing page” because it is the initial point of contact for visitors entering through these channels. In general, a landing page is a very effective marketing approach that doubles as a traffic generator and sales engine. You can start by building awareness for your landing page through paid ads, email, social media, and other channels. A higher percentage of visitors from these sources will become leads or customers if they are directed to a page designed specifically for this purpose. A landing page’s purpose is to increase sales, so it should be designed to capture the attention of visitors. Having an attractive design and layout for the numerous call-to-action elements, such as the buy button, signup forms, play media button, etc., is of utmost importance.
How to create a landing page in wordpress
Using a landing page plugin for WordPress, creating a landing page is a simple process. You don’t need to know how to code to use a plugin to turn WordPress into a powerful sales tool. A number of excellent plugins for creating landing pages in WordPress are available. But not every plugin does the same thing. This guide will teach you how to set up a landing page in WordPress with the help of the SeedProd plugin. Currently, there is no better landing page plugin for WordPress. It offers a user-friendly drag-and-drop editor, a large library of premade layouts, and prefab landing page elements to help increase conversions.
5-step process to create a WordPress landing page
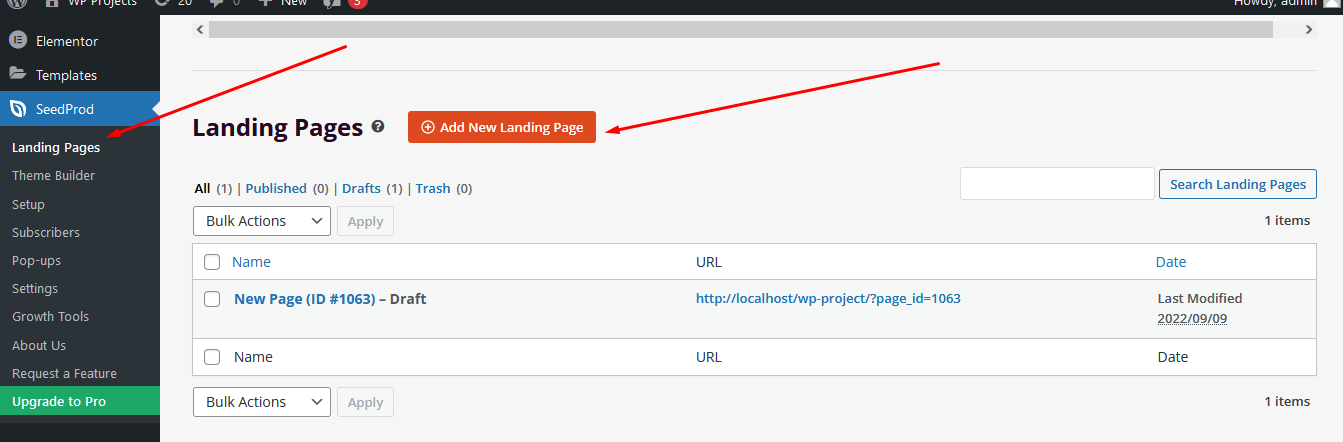
1. Install the SeedProd Plugin on Your Site
To get started with the plugin, you should go ahead and buy it from the SeedProd website. The plugin’s license key can then be copied after the plugin’s file has been downloaded to the computer. WordPress.org also has a lite version of SeedProd if you’d prefer to test the waters with it first. You’ll need to activate the plugin from within your WordPress administration area next. If you’re not sure how to install a plugin for WordPress, we’ve laid out every step of the process for you. Don’t forget to turn it on after you’ve installed it.
Then, on the registration page, you’ll be asked to enter the plugin’s license key. Once logged into your SeedProd account, paste in the license key you copied previously and click the Verify Key button. Scroll down and click the Create Your First Page button once you’ve entered and verified your license key. When you click the button, you’ll be sent to SeedProd’s control panel, where you can begin developing your landing page.
2. Create a Landing Page with SeedProd
There are a total of five editable page types accessible through the SeedProd control panel. The various states of the site (coming soon, maintenance, login, and 404) can be toggled at the top of the screen. A landing page-making option appears directly below it. If you want to create a new landing page, select the option to do so. A selection of landing page layouts will be presented for your selection when you click the button. SeedProd provides users with a plethora of enticing options for landing page layouts. The Sales, Webinar and Lead Squeeze categories are where you’ll want to start if you’re creating a landing page for marketing and sales. You can either use one of the pre-made designs or use the blank template. A template can be used by hovering over it and selecting the checkbox that appears. Afterward, you can add your own information to the pre-made template.
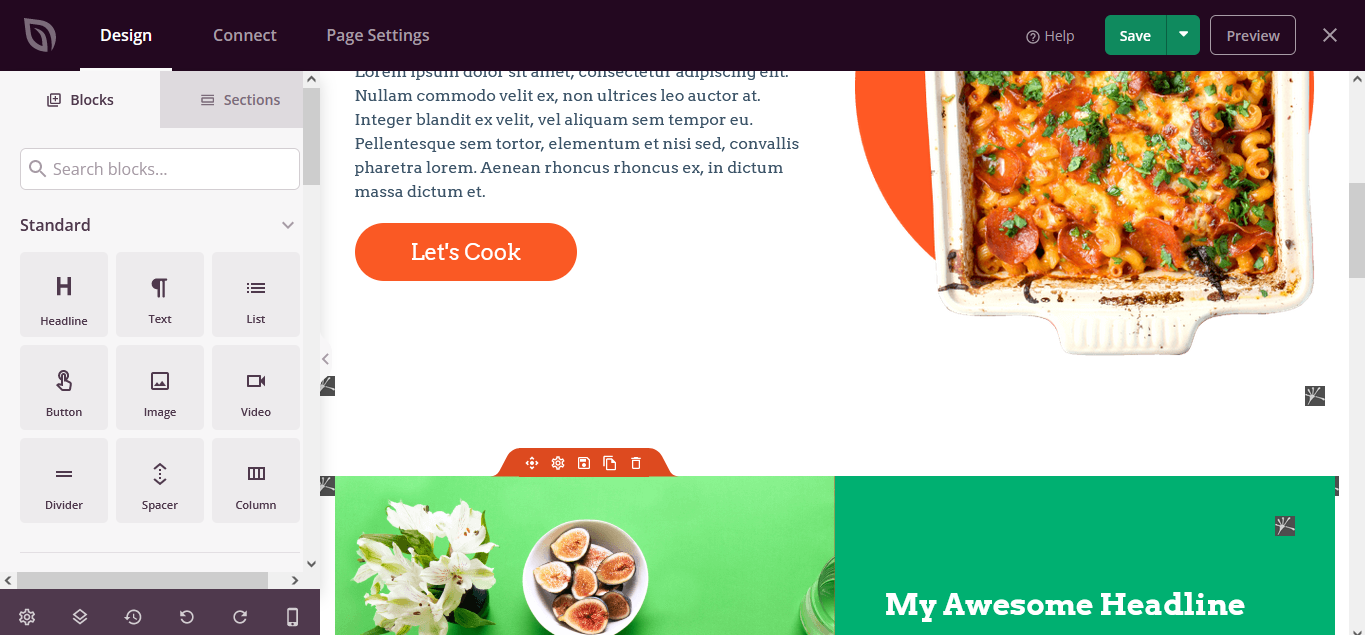
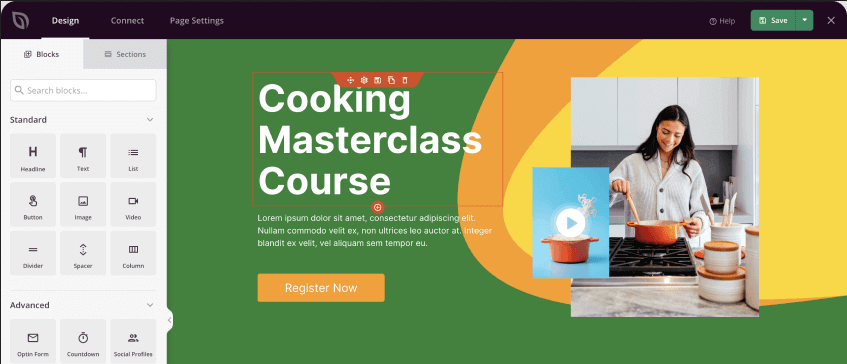
3. Customize the Landing Page Template
You can personalize your landing page using SeedProd’s visual drag and drop builder after selecting a landing page design. On the left side of the builder, you’ll see landing page blocks and sections you can add to the template. A real-time preview of your landing page is available on the right. The landing page template may be easily personalized by the user by only pointing and clicking on the various elements to make changes. Adapt the text to your product or brand’s aesthetic by changing its size, font, color, alignment, layout, etc. Similarly, you can swap out the template’s backdrop color or graphics for the regular colors and images you use for your product. In order to accomplish this, select “Global Settings” from the menu that appears. Click the trash can icon that appears when you hover over a landing page block to remove it. Any content block can be copied, moved, customized, and saved.
Your landing page template also supports the addition of new blocks such as buttons, optin forms, contact forms, social profiles, and more. To update an existing landing page, simply grab a landing page block from the sidebar and drop it where you’d like it to appear on the page. The use of a countdown timer is one way to create a sense of imminence. Again, you can modify the content, style, alignment, and more of any new block you add to your page by clicking on it. When you have finished making adjustments to your landing page, select save from the menu.
4. Connect Your Email Marketing Service
Connecting your landing page’s opt-in form to your email marketing provider is essential for capturing leads and expanding your mailing list. Select the Connect menu at the top of the page to begin. SeedProd is compatible with a wide range of email marketing platforms including but not limited to Constant Contact, MailChimp, and many more. Simply select your preferred email provider from the drop-down menu and then click the Connect New Account button. When prompted, just stick to the on-screen prompts to link your accounts and authenticate your identity. If you have set up an opt-in form on your landing page, any new email addresses will be added to your mailing list without any more action on your part.
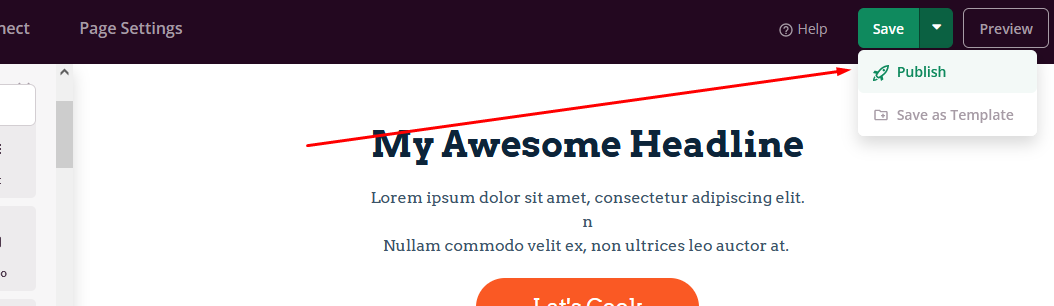
5. Publish Your Page
At long last, you may publish your WordPress landing page to the world! Simply select Publish from the menu that appears next to the Save button to make your landing page public. When your page goes online, SeedProd will display a message of congratulations. To preview your landing page, select the View Live Page option.
What is the difference between a homepage and a landing page?
When a user types in your domain name, they should be taken directly to your homepage. In contrast, a landing page may function as a stand-alone page when the vast majority of visitors arrive via paid or external traffic sources. The purpose of the homepage of your website is to encourage interaction from the visitor and subsequent actions like clicking through to other parts of the site, perusing the merchandise, or signing up for a membership. It offers more options and has more accessible links. A squeeze page, also known as a landing page, is optimized for increased conversions. It’s meant to prompt a purchase or information submission for follow-up communication and thus has fewer links.
What is the Purpose of a Landing Page?
A landing page’s purpose is to direct visitors toward a specific call-to-action. After clicking on an ad or a link in an email marketing campaign, most visitors will “land” on a specific page of your website. Landing pages tend to be more focused than the homepage and other parts of your WordPress site, which may feature several CTAs (such as links, forms, and chat functions). There should only be a single button to select, such as “Buy Now” or “Sign Up.”
Input fields like contact forms and newsletter registration fields are common fixtures on landing pages. In exchange for their information, you can offer them a coupon, a download link, or some other incentive, and potentially get a new customer. (Relevant to sign up forms: if you want to collect email addresses in addition to other data, you may want to look into MailChimp.)
Marketing and sales are the primary goals of landing pages. The goal is to have them serve as the starting point of a conversion or sales process. The information contained therein should have a narrow emphasis and be organized to encourage the reader to keep reading. The reader should feel compelled to take the action you want them to take at the end of the piece. Landing pages, however, have another, more analytical use. For instance, they can provide a means of quantifying the success of individual campaigns. Subsequently, we’ll have a more in-depth discussion of objectives. In a nutshell, you need to figure out if you want to educate the reader, generate leads and sales, promote your product or brand, or all of the above. Your landing page’s intended purpose will become clearer in light of this.
Conclusion
Having a landing page that attracts visitors and encourages them to convert is crucial. Optimize your WordPress site by creating landing pages with a focus on clarity, context, and content. If you wanted to know How to create a landing page in wordpress, we hope this post helped.
How to add new tab in my-account page at woocommerce
How to Disable the Language Switcher on WordPress Login Screen